- Sphere Engine overview
- Compilers
- Overview
- API
- Widgets
- Resources
- Problems
- Overview
- API
- Widgets
- Handbook
- Resources
- Containers
- Overview
- Glossary
- API
- Workspaces
- Handbook
- Resources
- RESOURCES
- Programming languages
- Modules comparison
- Webhooks
- Infrastructure management
- API changelog
- FAQ
Our implementation of the webhook mechanism has been designed to deliver a reliable and efficient method for event communication between Sphere Engine components. When the execution of the submission finishes, our system instantly sends a message about it to the client's system. Think of it as push notifications from social media services that go directly to your web browser.
The following diagram depicts the idea is a very simple way:
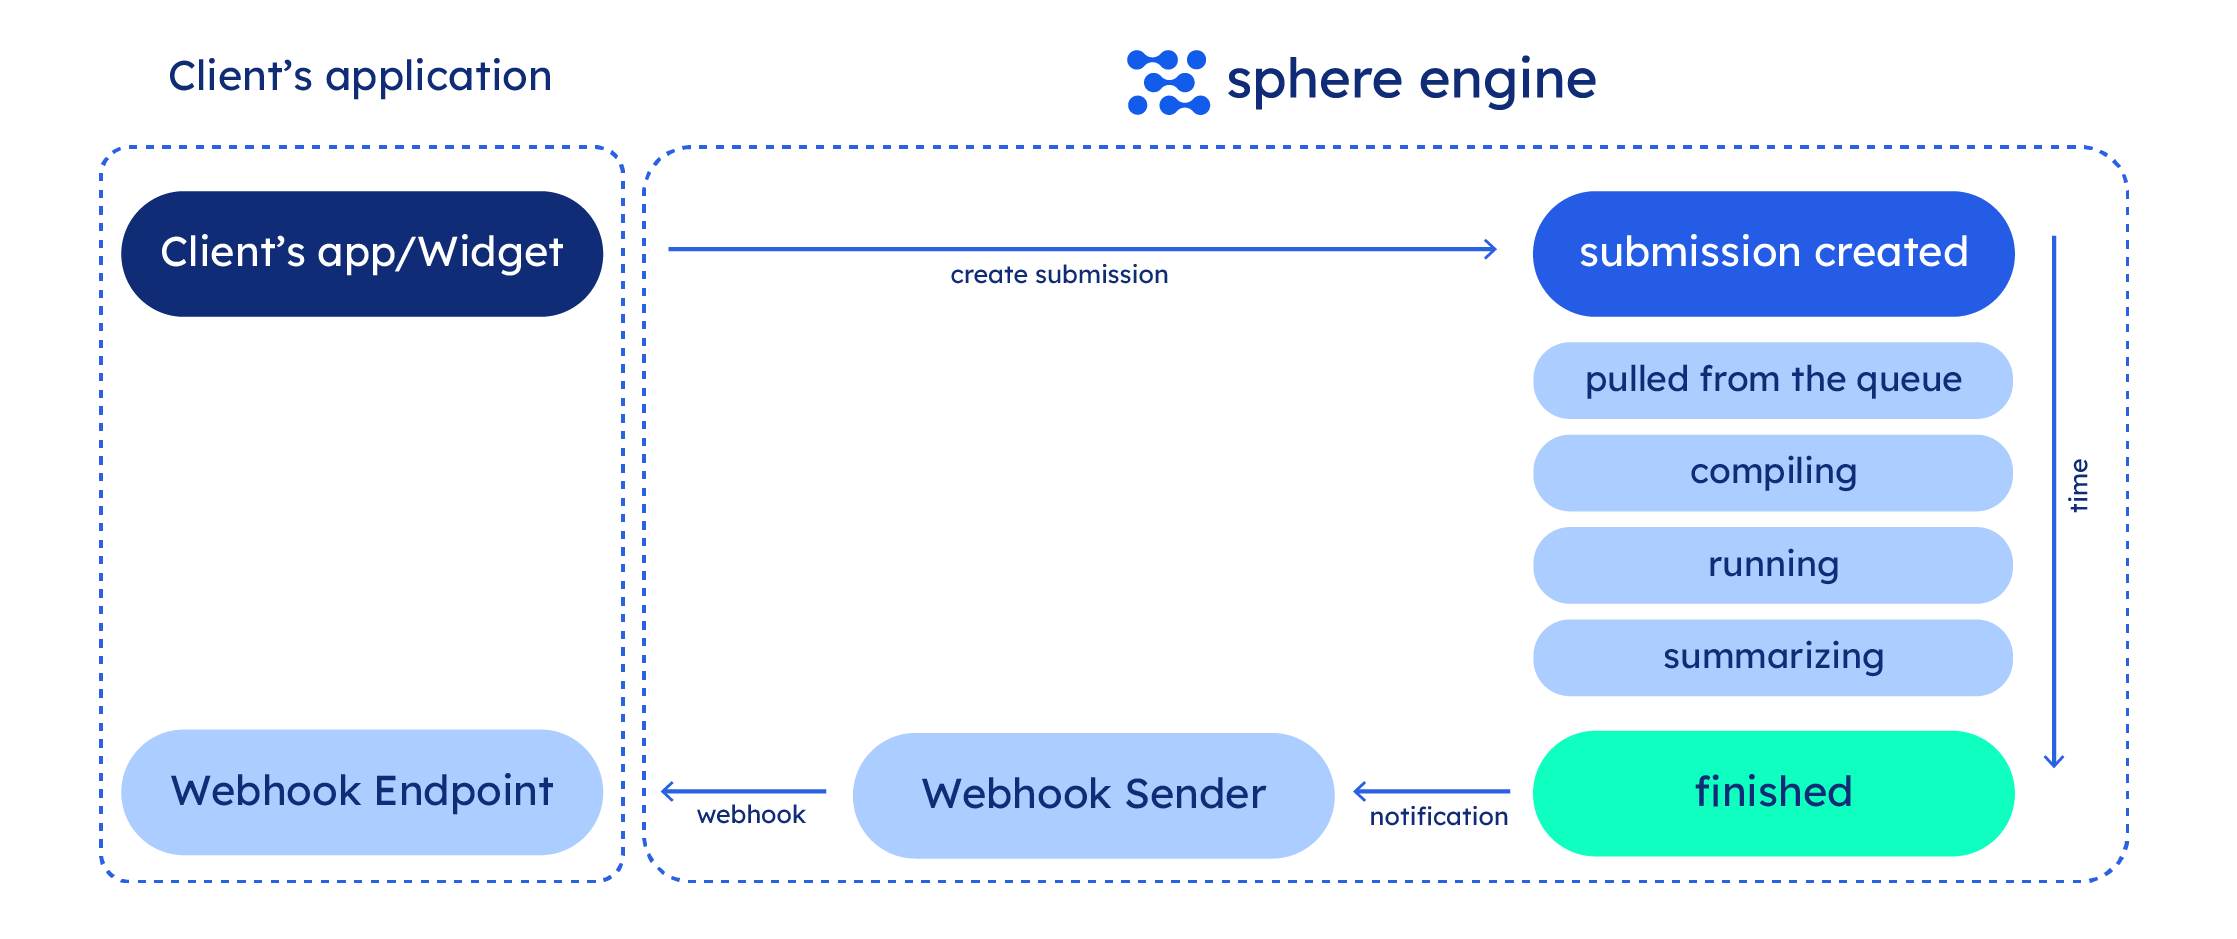
What are webhooks and how to receive them?
Webhook is nothing more than an HTTP request that goes from a service (Sphere Engine) to the client's application.
Note that the communication flow in the case of webhooks works opposite to the usual one in which the client is a side
that sends the request.
Receiving webhooks consists of:
- publishing an endpoint to send requests to (e.g.,
your_awesome_site.com/your_app/webhook_endpoint), - receiving and processing incoming requests inside your application.
You can receive webhooks from all Sphere Engine components:
- Compilers API,
- Compilers Widget,
- Problems API,
- Problems Widget,
- Containers Workspaces,
- (coming soon!) Containers API.
Configuring a webhook in Sphere Engine Dashboard
The webhook configuration is global for all Sphere Engine components. Go to Dashboard > Webhooks and provide the
required information. For example:
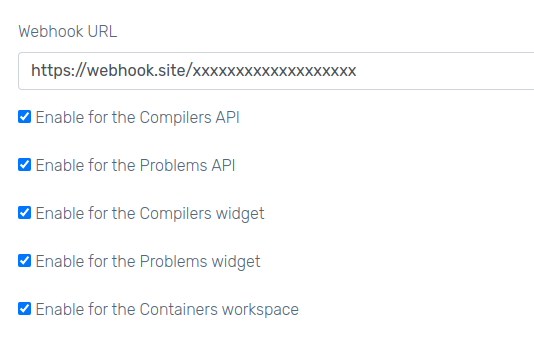
- Fill the
Webhook URLfield with a complete URL of your webhook endpoint; Sphere Engine uses this address to send requests to. - Choose which notifications you want to subscribe to; requests from all modules are sent to the same webhook endpoint,
but you will be able to distinguish between them using the information from the message body by the field
origin. - [Optional] Click the
Send test webhookbutton to send a test message to your endpoint. You can use it to check whether your endpoint is properly configured and ready to receive webhooks. You will receive a message for each module you have subscribed to. Test webhooks have the same structure as regular ones, but in the body data, you will find a message field with the valueTest webhook received successfully!and a sender field with the service name (e.g.,Compilers API).
Acknowledging webhooks
Sphere Engine service keeps a webhook message for a while to make sure that the client has received it properly. The
elementary rule that the webhook endpoint should implement is that each webhook is an HTTP POST request that expects a
specific response:
- respond with the
HTTPstatus code200to acknowledge receiving and processing the webhook message, - any other
HTTPresponse code will be interpreted as a failure and webhook message will not be acknowledged.
Occasionally, the same webhook message can be delivered more than once, even if the message has been properly acknowledged. Take that into account in your webhook endpoint implementation.
Retry schedule in the case of failures
Sometimes, the first delivery attempt of the webhook message fails. It can be caused by multiple factors. Just to name a few:
- network failure between client's webhook endpoint and Sphere Engine service,
- unexpected failure on the Sphere Engine side,
- unexpected failure on the client's application side,
- unacknowledged webhook message (i.e., non-200
HTTPstatus code in the response).
To make sure that the webhook message does not get completely lost, we defined a retry schedule. For each message, we
will do up to 15 or 12 additional delivery attempts. Each attempt is performed with a delay that grows with the
total number of attempts according to the table:
| # | Delay (Submissions) | Delay (Workspaces) |
|---|---|---|
| 1 | 1 second | 1 second |
| 2 | 3 seconds | 3 seconds |
| 3 | 9 seconds | 9 seconds |
| 4 | 16 seconds | 16 seconds |
| 5 | 32 seconds | 32 seconds |
| 6 | 1 minute | 1 minute |
| 7 | 5 minutes | 5 minutes |
| 8 | 15 minutes | 15 minutes |
| 9 | 45 minutes | 45 minutes |
| 10 | 2 hours | 2 hours |
| 11 | 4 hours | 4 hours |
| 12 | 8 hours | 8 hours |
| 13 | 12 hours | 8 hours |
| 14 | 12 hours | - |
| 15 | 12 hours | - |
| 16 | 12 hours | - |
For submissions, webhooks may take over two days to be properly delivered, while workspaces allow almost 24 hours for
webhook delivery. After a series of respectively 16 or 13 failure attempts, the webhook message is lost and will not
be delivered.
Testing webhooks without endpoint
If you simply want to test the features, reliability, or behavior of the webhooks you can do it without an endpoint on
your side. Such services as https://webhook.site or
https://requestbin.com/ allow you to generate a unique custom URL that you can use as your
webhook endpoint for testing purposes.
Implementing webhook endpoint
It is possible to implement a webhook endpoint using any technology that can handle HTTP protocol. You can do it as a
standalone application as well as part of a bigger one. You can use a web framework or create everything from scratch.
Here is a simple PHP script that implements an elementary webhook endpoint capable of receiving incoming messages and
storing them in a messages.dat file.
<?php
  file_put_contents('messages.dat', 'HEADERS: ' . serialize($_REQUEST) . PHP_EOL, FILE_APPEND | LOCK_EX);
  $requestBody = file_get_contents("php://input");
  file_put_contents('messages.dat', 'DATA: ' . $requestBody . PHP_EOL, FILE_APPEND | LOCK_EX);
  http_response_code(200); // response code 200 to acknowledge
In the example, you need to read standard input data to fetch request body data. If you use a web application framework
(e.g., Symfony, Django, Laravel) it is very likely that there is a dedicated method that helps you get raw body data
from POST requests.
You can configure any web server to use the above file for processing requests. You can also run a build-in PHP web
server using the following command:
php -S 0.0.0.0:8080 webhook_endpoint.phpThis command starts a web server on the port 8080. Requests will be processed by the webhook_endpoint.php script.
Keep in mind that your server needs to be accessible from the internet. You cannot provide localhost, 127.0.0.1, or
any local address as a webhook endpoint address.
Webhook message specification
The specification of the webhook message is slightly different for distinct modules: