- Sphere Engine overview
- Compilers
- Overview
- API
- Widgets
- Resources
- Problems
- Overview
- API
- Widgets
- Handbook
- Resources
- Containers
- Overview
- Glossary
- API
- Workspaces
- Handbook
- Resources
- RESOURCES
- Programming languages
- Modules comparison
- Webhooks
- Infrastructure management
- API changelog
- FAQ
In the glossary we briefly introduced all the concepts related to the Sphere Engine Containers. At this point, the general scheme of the module is probably clear. In this chapter, we will give a deep insight into the process of building a programming projects.
The programming project is the foundation of all actions around the Containers module. It states a context for end-users' operations such as executing their application code. Naturally, this context needs to be designed and prepared by the content manager. The objective is to create an environment allowing the execution of the applications with a given technological stack.
As an example, consider the following hypothetical use case: we want to deliver a WordPress framework for our end-users to play with it. It yields the following requirement for a project:
- it provides
PHP 7.xand,- (optional, but useful)
composerfor third-party libraries,
- (optional, but useful)
- with
MySQL(version5.7or greater) orMariaDB(version10.2or greater), - with
Nginx(orApache) web server, - with the latest version of the
WordPressapp.
Providing we have access to such an environment, we can actually run the WordPress framework. This is exactly what are the projects for.
We will learn step-by-step how to create a well-designed programming project. Let's start from the list of the steps needed to unlock the full potential of the Sphere Engine Containers module:
- Step 1. Creating a new project,
- Step 2. Selecting a base project,
- what is it and what does it offer,
- how to pick the right one
- Step 3. Customization,
- uploading an application,
- installing dependencies,
- Step 4. Run-time environment,
- selecting necessary services,
- initialization procedures,
- execution procedures,
- test procedures,
- Step 6. Usage.
Now, we will now go through all the steps and discuss their role in detail. At the same time, we will present the elements of the user interface responsible for the procedures in question.
Step 1. Creating a new project
In this step, we will learn where to start the process of creating a new project. First, go to the Sphere Engine dashboard and then click the Editor in the Workspaces section of the left hand side menu. You can also use a direct link.
This way, you will get to the list of projects, which may be empty at this stage.
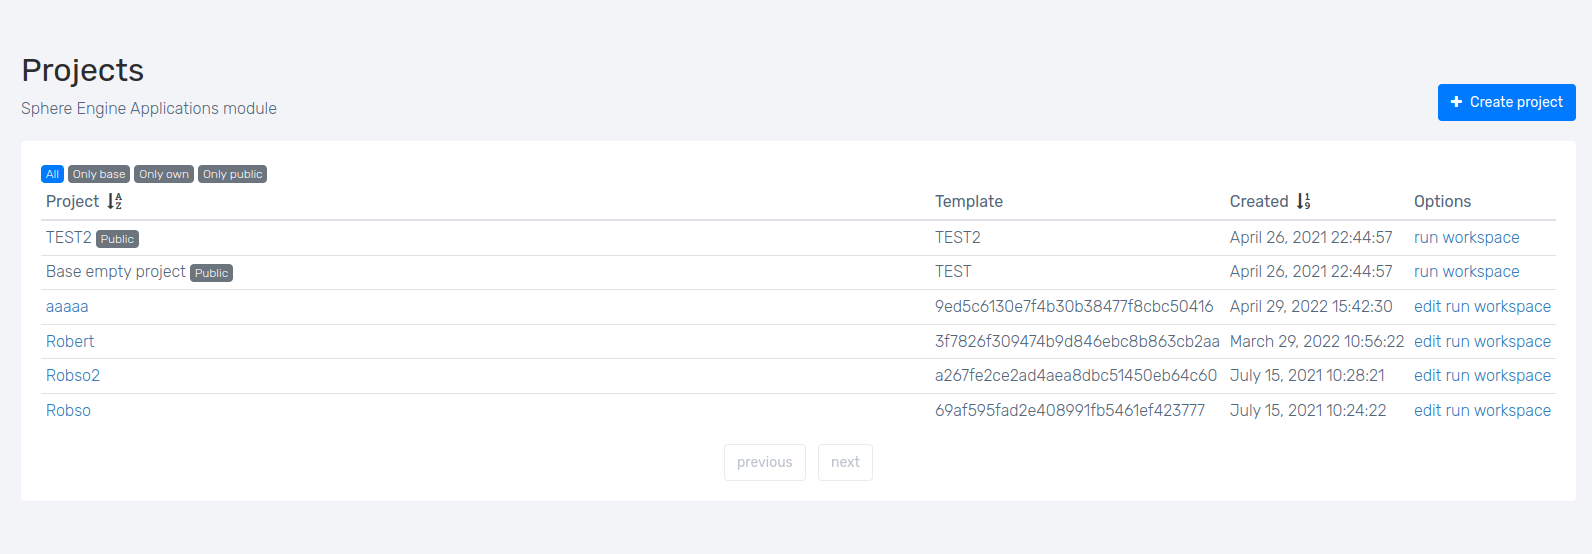
Use the button Create project in the top-right corner to start creating your new project. You can also simply use a direct link to skip the journey through the dashboard.
This way, you should be at the first project creation screen:
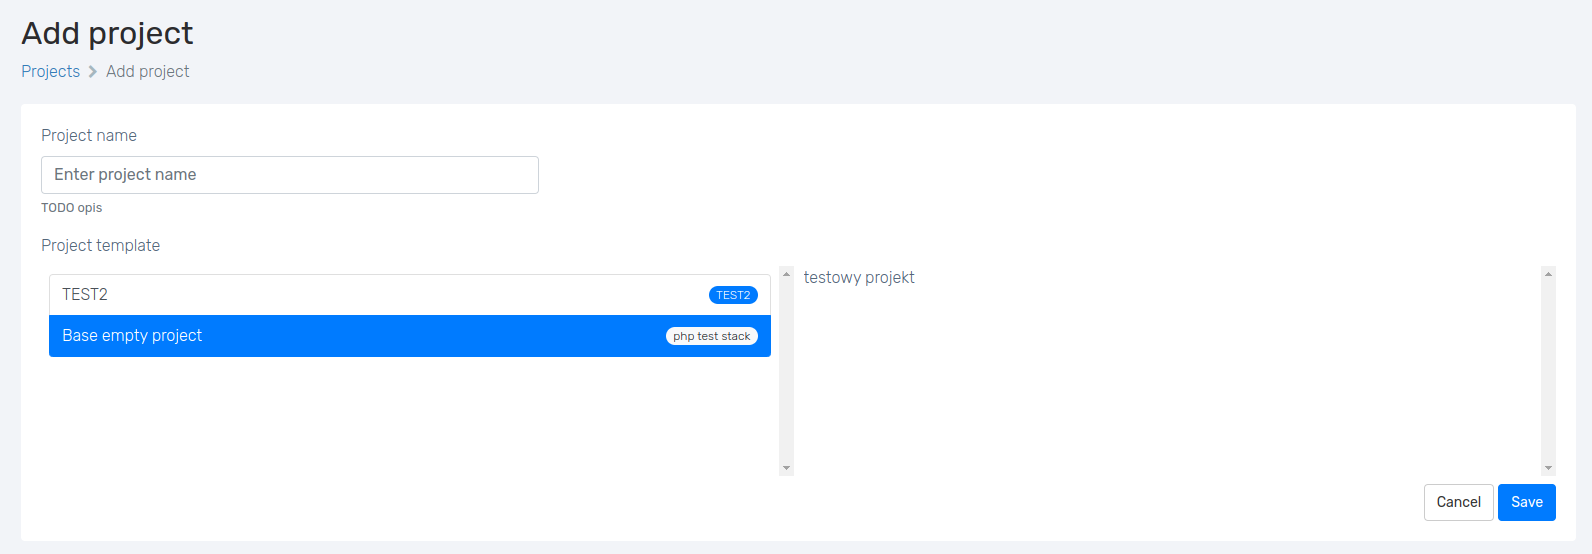
Here you can give your project a name and select a base project.
It is advised to use a descriptive name to easily manage your projects in the future. Nevertheless, it is technically irrelevant.
Step 2. Selecting a base project
A base project is a template from which we start building our customized environment. The Sphere Engine Containers module offers a variety of bases for different purposes. All of them are well described in the user interface, so usually selecting one is straightforward.
In the hypothetical use-case above, we discussed an environment with PHP, MySql, Nginx, and WordPress
web application. For such a requirements, a universal web-application base project seems to be suitable. This way,
we will start from a project equipped with PHP and configured Nginx server.
When choosing a base project, it is worth looking for the one that supports a desired technologies out of the box.
Once ready, confirm your choices with the Save button in the bottom-right corner. You will be sent back to the project list.
Step 3. Customization
At this point we already have the foundation for our project. A base project selected in the previous step provides with a technological stack needed to install, configure, and run the application.
We are ready to upload our application and make all the adjustments. First, find your project on the project list (link) and click on its name to enter into the customization screen.
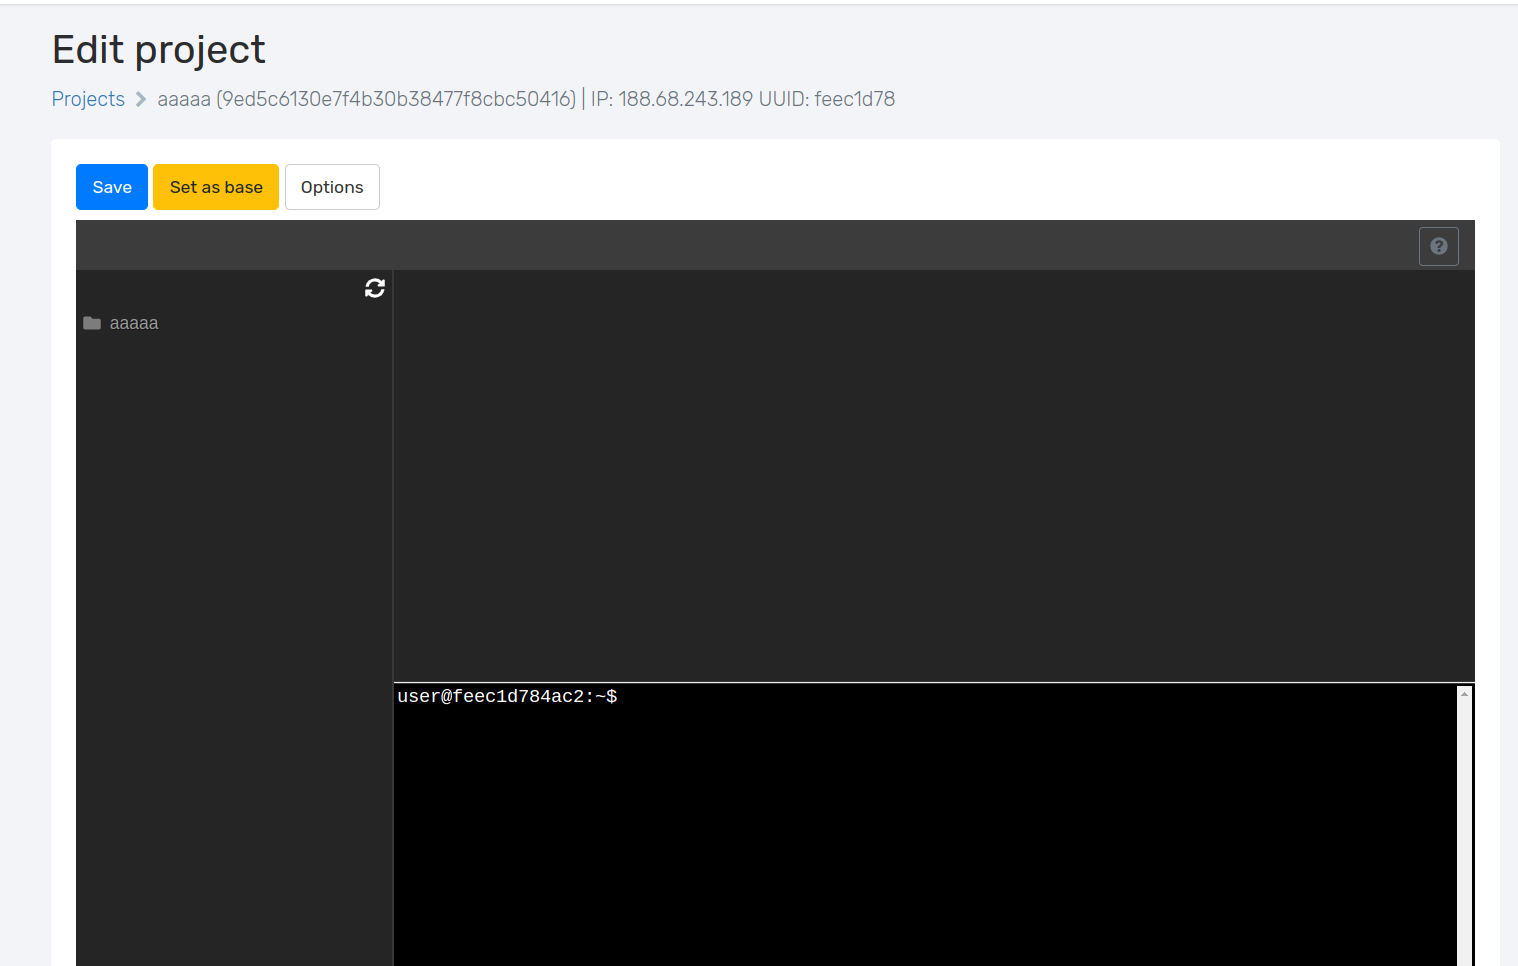
The customization view is dominated by the full-fledged online IDE. Behind the scenes, our project in its current shape is already lunched and you can interact with it. The components enabled inside the IDE depend on the selected base project. But, in general, you can expect:
- directory tree anchored in
/home/user, - code editor with syntax highlighting,
- interactive terminal,
- read-only terminals (irrelevant at this point).
It may take a couple of seconds to initiate the IDE in the customization screen.
Use the IDE in the way you are familiar with from other tools like Visual Studio Code. If you want to upload your
application from your local machine, we recommend to create a single file archive with it (it can be either zip,
tar, tar.gz, or other). Then, click the upload button at the top of the
directory tree and upload your file. Once it's there, you can extract it using integrated terminal (for example
with unzip or tar commands).
Alternatively, you can download your files over the Internet. You can use git clone command for Git resources
and wget or curl for other files.
In our example, we discussed a WordPress web application. We can use the following commands to download, and then
extract it to the /home/user directory.
$ wget https://wordpress.org/latest.tar.gz
$ tar -xf latest.tar.gz -C /home/user
Last but not least, we need to configure our project. The configuration depends on the technological stack. For most
PHP projects you need to use composer to fetch all third party dependencies. For Python applications, you
do the same with pip. Each application has its own specifics regarding the configuration. All the operations
required for a complete configuration of the projects can be easily done by the integrated terminal.
Sphere Engine Containers projects use the Debian distribution of the Linux operating system. Content manager should
be familiar with the basics of the bash (i.e., Linux command line) to easily configure projects.
Once we are done with the configuration we can save out project using the Save button above the Online IDE. The saving procedure may take a couple of seconds to finish.
Step 4. Services
After the previous step, our application is deployed and configured. For some projects, everything is already done.
But usually, modern applications require additional services to be able to operate. One uf such popular requirements
is a relational database management system (e.g., MySQL, PostgreSQL).
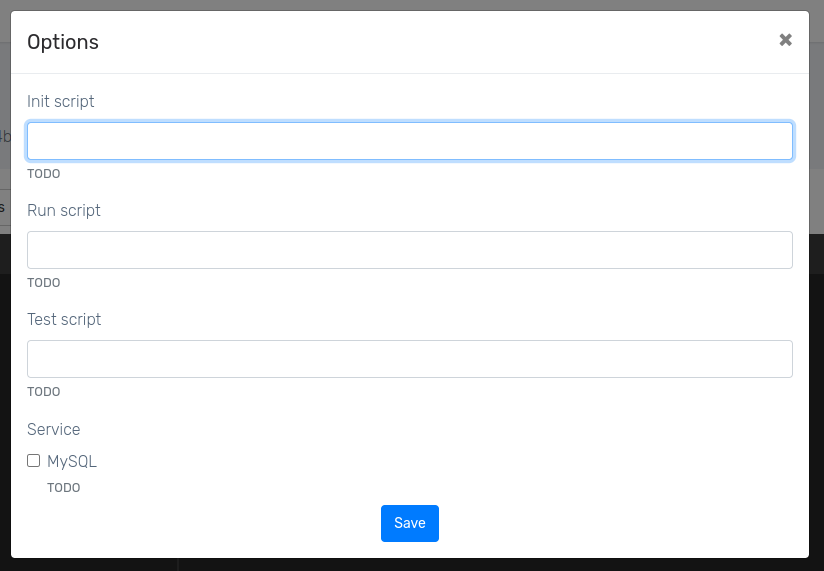
Running each additional service is a time and resource consuming task. Therefore, in the Sphere Engine Containers, we optimized projects to use only services that are absolutely necessary. If your application require an extra service to work, you can configure your project to use it. First, click on the Options button. Then, select required options at the bottom of the modal window.
After selecting necessary services use the Save button above the Online IDE to save the changes. The saving procedure may take a couple of seconds to finish.
Step 5. Run-time environment
This is the last step of the project configuration process. By now, we already have a fully configured project
that can be executed in the Sphere Engine Containers environment. Yet, we still missing any definition of the
execution procedures. We call such procedures scripts, because usually it is the most convenient to wrap the
whole procedure in a form of a single-file bash (Linux command line) script.
There are three different types of scripts:
- initialization (
init), - execution (
run), - verification (
test).
To define the scripts, click on the Options button. Then, complete the appropriate fields ("Init script", "Run script", and "Test script") in the modal window with desired commands.
Initialization script
This is a procedure dedicated to application initialization. In the init script you can, for example,
create a structure and populate a database.
We recommend a convention of creating a separate executable bash script /home/user/init.sh. In such a file, you can
have a couple of initialization procedures and keep everything readable. In such a scenario, you can fill the option's
field simply with script name (i.e., init.sh).
Execution script
This is a procedure dedicated to application execution. In the run script you can, for example, start a web server.
We recommend a convention of creating a separate executable bash script /home/user/run.sh. In such a file, you can
perform a sequence of execution procedures that together form a whole. In such a scenario, you can fill the option's
field simply with script name (i.e., run.sh).
Verification script
This is a procedure dedicated to application verification. In the test script you can, for example,
perform unit tests or functional tests.
We recommend a convention of creating a separate executable bash script /home/user/test.sh. In such a file, you can
have a sequence of testing procedures that together form a whole. In such a scenario, you can fill the option's field
simply with script name (i.e., test.sh).
Once you define all the run-time procedures, click on the Save button above the Online IDE to save the changes. The saving procedure may take a couple of seconds to finish.
Step 5. Usage and tests
After the previous steps, our project is finished. Let's recall what have we done to get to this point:
- selected a base template and gave the name to our project,
- deployed application files,
- installed dependencies,
- picked necessary services (like
MySQL), - defined run-time procedures (known as scripts).
We are ready to use our projects. First, we recommend try it in the interactive mode, from the Online IDE. Secondly, we will use RESTful API.
Online IDE
We need to get back to the list of the projects. Start from the Sphere Engine dashboard and then click the Editor in the Workspaces section of the left hand side menu. You can also use a direct link.
Locate your newly created project and click the Run workspace in the column Options. Wait a couple of seconds, the new workspace is being created for you behind the scenes.
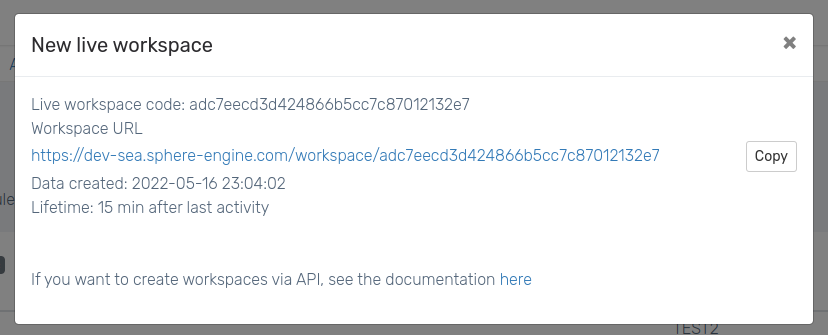
Once you see a modal window, copy open the link to your workspace. You will see something familiar - the Online IDE, but without any additional context.
If you want to execute your project, use the buttons Init, Run, Test above the file editor. You will be able to track the live output in the read-only console.